


The Microsoft Surface Laptop line of products was launched in 2017 as Microsoft wanted to show the world their vision for the ideal Windows laptop experience. The first Surface Laptop was thin, light, and powerful with good battery life. As a signature look, the engineering team found a way to incorporate the soft Alcantara fabric over the keyboard deck.
Unlike Microsoft’s first laptop, my first laptop experience was quite different. Upon starting my first job, I was issued an 8-pound, 17-inch desktop replacement that I dutifully lugged back and forth from the office each day and on countless trips to China. My colleagues and I nicknamed them “lap crushers” instead of “laptops.” Things have changed in the last 15 years!
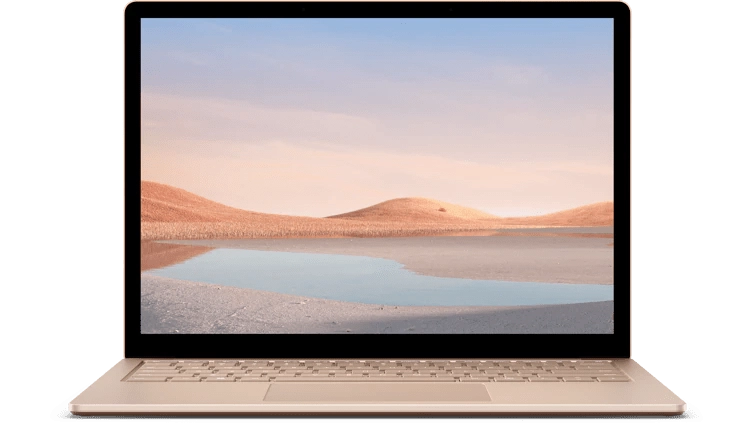
Microsoft Surface 4 Laptop – Image courtesy of Microsoft.com.
Fast forward to the 4th generation of the Surface laptop, and Microsoft has tweaked its design approach. While maintaining nearly the same dimensions, they have made it easier to pry open the device and get a look inside. That helped us open the device up and see what the engineering team has learned and then implemented in this latest laptop iteration.
Tobias and Molly joined me for this teardown after sharing their first laptop experiences. We were particularly grateful for Molly’s experience working on Chromebooks while at Google to help guide us through some interesting design choices. Tobias even showed his first laptop — a Thinkpad — that he dug out of his attic.
As gadget people, it’s fun to reminisce about the days of modular parts and swappable batteries, but it is hard to argue that all of it is necessary now that the world has shifted to efficient and powerful computing, wireless technologies, and cloud based applications.
Overview of the Surface Laptop 4
Weighing in at just over 2.8 pounds, the sandstone-colored, all-aluminum laptop sports a 13.5-inch display with a camera and several sensors above it for the Windows Hello facial recognition service. The laptop features USB-A, USB-C and headphone jacks on the left while the surface connect port is on the right. On the laptop deck, we see a chiclet style keyboard with a generously sized touchpad. Microsoft designed an overhang by making the display housing slightly larger than the base, which allows the user to easily open the laptop with one finger.
Tearing down the Microsoft Surface Laptop 4
To open the device, I first looked for visible fasteners. But unlike most other laptops we have seen, this one only had four screws neatly hidden underneath the rubber nubs at each corner. These screws clearly joined the top and bottom of the housing together, but instead of releasing a bottom cover, the top came loose with a bit of prying. It was surprisingly easy to pop off the top cover by prying an iFixit tool into the reveal. Once the screws were removed, the keyboard deck was only held down by magnets on the perimeter. A single connector with a generous service loop joins the two halves electrically.
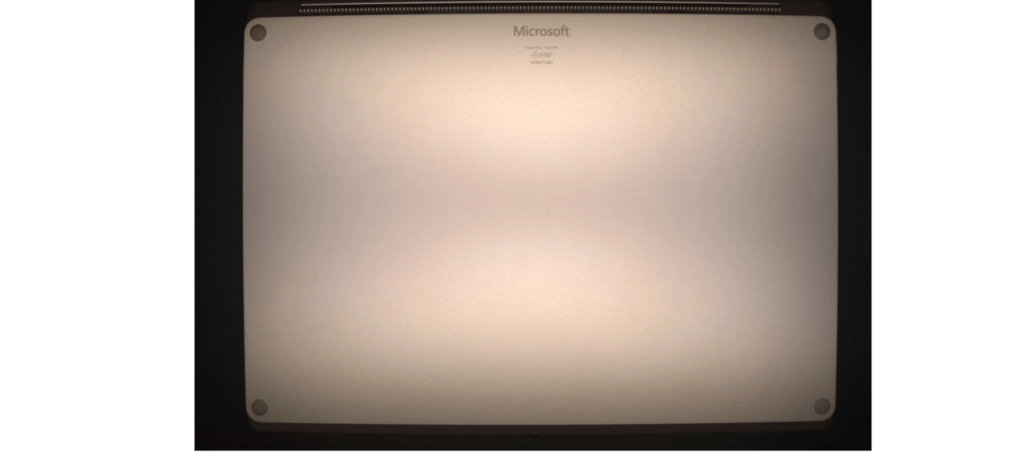
Bottom of the surface laptop 4 with no visible fasteners.
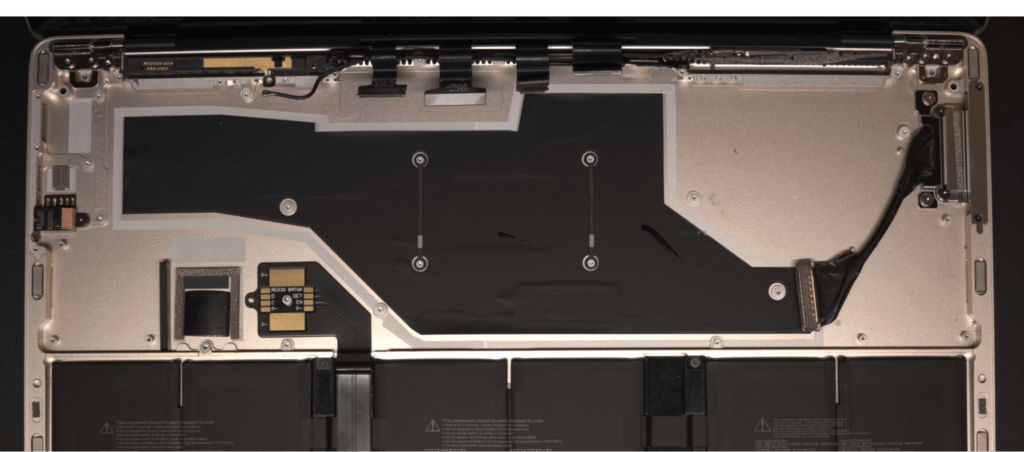
Removing the keyboard deck, we were immediately greeted with the main components of the device. This is an interesting architectural choice more aligned with a tablet than a typical laptop. Perhaps Microsoft leveraged its initial designs of the Surface and Surface Book in development of the first device and kept the architecture through subsequent generations.
Another thought about this keyboard top cover is that Microsoft still offers versions of this laptop with the Alcantara fabric, even though ours was all metal. Since it’s hard to make a structural frame out of a fabric, this could be another reason why the architecture inverts the typical bucket structure. To make the Alcantara version work, a thinner but stiffer material like a stamped stainless steel bracket would be needed underneath the fabric to keep the overall thickness consistent and maintain the structural rigidity that the aluminum version offers.
Because I could see a lot of work coming my way to pry up and unbolt the main components, Molly walked us through a close look at the laptop through images on the Instrumental platform.
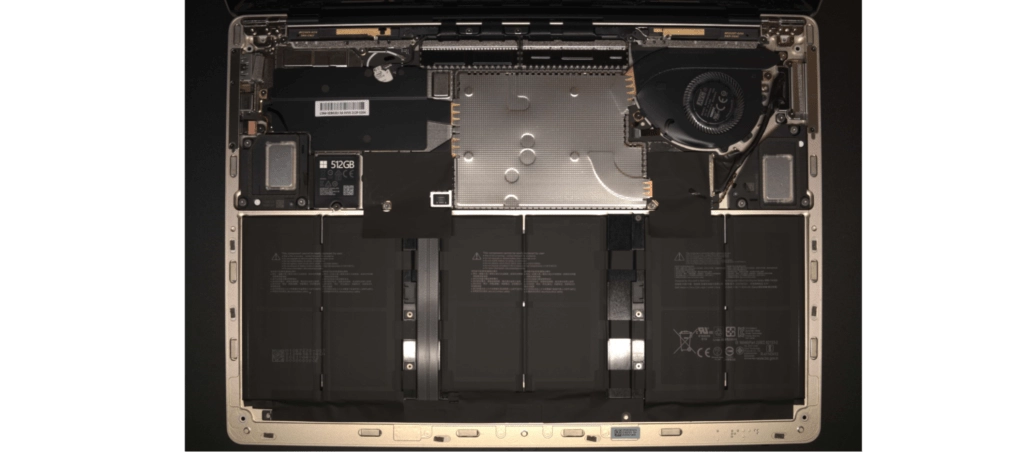
Inverted Bucket containing all the major components of the Surface Laptop 4.
Microsoft Surface Laptop keyboard deck
Molly first took us on a quick jaunt around the keyboard deck. Speculating another reason why the engineers might have chosen this design, Molly pointed out from her experience that some of the most common failures on a laptop occur at the trackpad and keyboard. Instead of having to remove nearly everything from the device, a repair facility could simply switch to a new top case.
In the upper corners, closest to the display, we found 4 screws which don’t seem to have any function other than being made of ferrous material to attract magnets from the base. A member of the audience suggested this might be a way to tune the level of the frame so that each device can have that perfect reveal along the split line and is as good a theory as any we had.
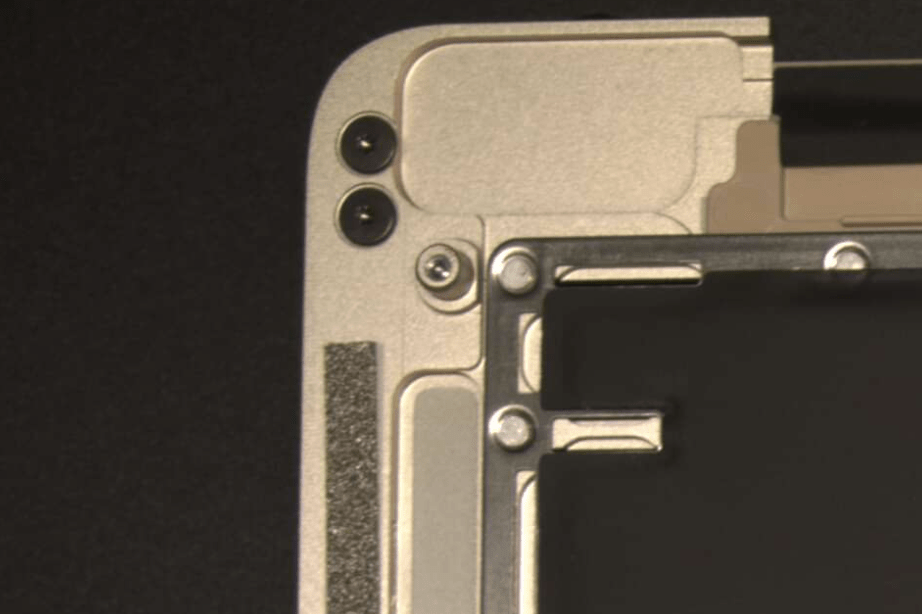
Screws in the upper corners of the keyboard deck don’t hold anything down but attract the magnets below.
That adjustability might be important because the next area that we zoomed in on were mesh coverings on either side of the laptop directly above the speakers. Instead of a sealed back volume with ports out the sides, Microsoft engineers decided to direct the sound up through the keyboard. This means they had to be confident that the displacement of the air would not rattle or vibrate any of those keycaps, which can be a significant annoyance for consumers.

Speaker mesh covering an opening in the keyboard backing.
Moving below the keyboard, we get a quick glance at the trackpad. With 6 large screws on each upper side and a single dome switch at the bottom, this trackpad is clearly designed to be tapped and clicked often and stand up to the rigor of several years of use.
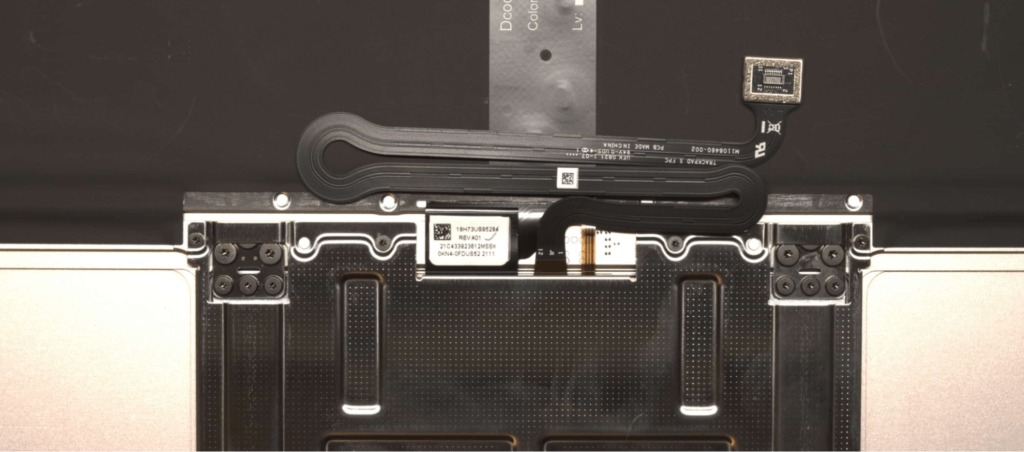
Trackpad hinges and connector with long service loop.
Inverted Bucket Enclosure
Switching to the components in the main bucket enclosure, we were puzzled by some black tape at the corners of a large central shield can with a few screw hole openings. These tapes might have served two purposes: one is to direct all attention of a casual tinkerer to the SSD and two to further spread out heat from the tails of the heat pipe that sit underneath.
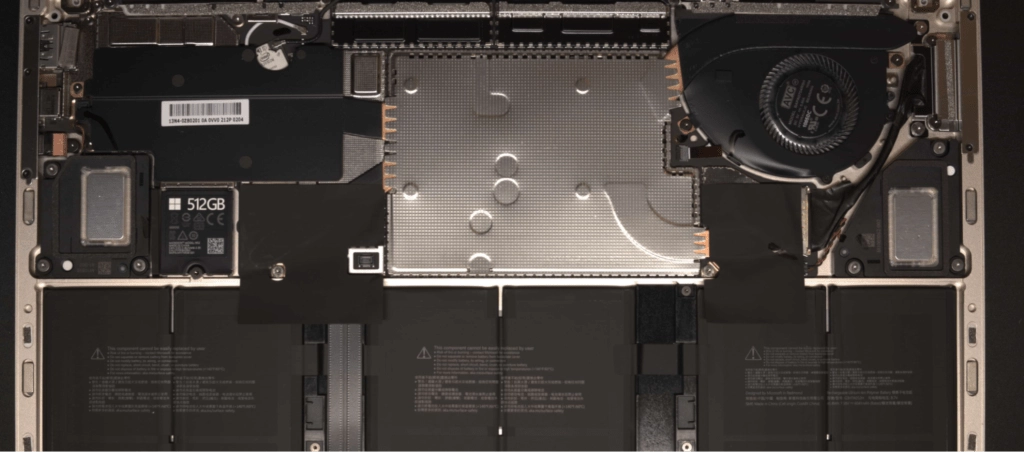
Large tape and heat spreader material cover areas to the left and right of the main shield.
Much like the machined housings of the Mac Studio we tore apart earlier this year, there were several different braille-like machine marks near the corner of the main housing. The team at Microsoft also seems to track each housing through different machining steps. Because this one was anodized in rose gold, we also saw what looked like one mark done after anodization as the dots were silver colored.
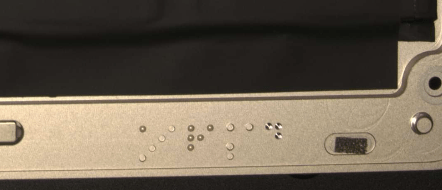
Marks to identify date, manufacturer, machine, or process information.
Cycling around to another major failure point on laptops, we took a closer look at the hinges for the display. Because laptops fold open thousands of times in their lifetime, a good hinge design is critical to function. Microsoft’s hinge seemed to have an interesting U shape. While this extra flange costs more and takes up space, Molly speculated that this helpful extension could make adjusting the hinges easier by providing the operator with a little more leverage on the hinge joint.
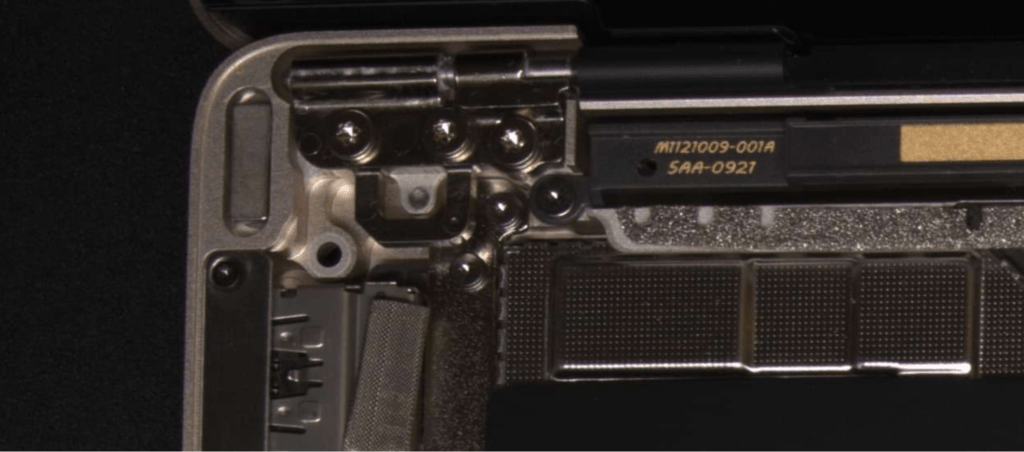
Hinge with an extra u-shaped tab in the upper corners.
Since I was still struggling to take apart all of the shields and components, Molly also virtually removed the main shield by showing the next image and we took a look inside. On the PCBA, we saw a wireless module soldered at a slight angle with a curious coax connection of about an inch in length. Unlike previous generations where most of the chips were laid out on the board directly, for this generation, the engineers specified an entire module that needed to be soldered. The angle could be required to meet keep out requirements from nearby metal or because of trace routing underneath.
We also took a closer look at the thermal design which included two heat pipes and a fan. Since I was close to removing the board, I was able to show the machined slits in the back of the device which allow air to enter or leave the main chamber. However, we had to look again later as the holes for the fan are cut at a unique angle and are more square in shape. This indicated to us that the holes were designed to be machined at an angle and the squircle shape maximized volume of airflow and might also disguise their angled inclination.
We took a look at how the keyboard and trackpad flex assembly worked before sending it back over to Molly, who played a neat assembly video showcasing new features of the Instrumental platform. By watching how the operator works, it’s conceivable that an engineer could identify improvements to process and training without having to be physically present.
Under the PCBA
I finally was able to take out the board and showed off some of the features of the main housing itself. One interesting thing is that the battery was always physically connected under the board throughout the teardown. This means that Microsoft probably had some way of disconnecting the battery electrically to make sure the board would not be powered on as we disassembled it. This might be one of the downsides to this architecture, but they were able to overcome the problem through some creative engineering. On iFixit’s teardown of the Surface Laptop 3, they speculate that some hardware in the SSD connector triggers the board to power down which would be smart since the computer can’t really function without the main operating system onboard.
Beneath the PCBA of the Microsoft Surface Laptop 4.
We also took a look at some ribs underneath the main PCBA. These seemed to be almost directly under where the main heat sink for the CPU was located. Since that heatsink and heat pipe combination are tightly bolted down, these ribs likely support the CPU so that it is not under excessive strain. If they didn’t do this, the solder connections could eventually fail or result in intermittent connection issues for the user.
Wrapping up the Microsoft Surface Laptop teardown
After taking apart the Surface Laptop 4, it is apparent that Microsoft listened to feedback on its first generation laptop and has found ways to further optimize the design. Modern laptops like this one are incredible machines that have evolved quite a bit since some of the first versions decades ago.
If you enjoyed this overview of the teardown, watch the recording below and let us know what you’d like us to open up next!
For access to the teardown image library with the Echo Show 10 and all of the other devices from the Change Notice Unsnapped series, contact us at communications@instrumental.com.
Chris Li is a former Amazon Product Design Engineering Manager and teardown lead for Instrumental. He brought multiple generations of the Kindle to market and advised on the first Echo and Fire TV products. He also worked as the VP of Product Design at the healthtech startup, PillDrill, which shipped an award-winning medication tracking system. He is now a Mechanical Engineer at Agtonomy, an autonomous tractor startup.
Author
Related Topics